Difference between revisions of "Projets:Perso:2011:Motorshield"
(Testons une orga moins merdique...) |
|||
| (22 intermediate revisions by 2 users not shown) | |||
| Line 1: | Line 1: | ||
= Introduction = | = Introduction = | ||
| − | + | What should you do if you wanna plug motors to your Arduino ? There's [http://ladyada.net/make/mshield/index.html this cool Motorshield from Adafruit industries], but it handles such little currents ! Fortunately, there are other nice chips out there... | |
| − | + | ||
| − | + | OpenHW is about commiting patches, right ? So here's mine ! | |
| − | + | [[File:Motorshield-overview.jpg|400px|center|thumb]] | |
| − | [[File: | + | |
<center>The current prototype.</center> | <center>The current prototype.</center> | ||
| − | + | ||
| + | == Latest news == | ||
| + | * This project has been put to good use for a student project, stay tuned for more information/pics ! | ||
| + | * Almost everything is ready to launch the first production batch. Pre-order will be opened soon. | ||
| + | * This design serves as a reference for the ongoing tests on PCB fabrication. We're pretty close to being able to manufacture stuff like that in the lab :) | ||
== Design goals == | == Design goals == | ||
| Line 15: | Line 17: | ||
| − | Note that I | + | Note that I decided to call this shield "the Arduino sHHHHield - an Arduino shield with four H bridges" and am proudly claiming full fame and credits and everything for such a lame name :-) |
== Features == | == Features == | ||
| Line 42: | Line 44: | ||
Yeah, I know, I hate those "see conditions below" things, but hey, this is only a prototype at the moment, so live with it :) | Yeah, I know, I hate those "see conditions below" things, but hey, this is only a prototype at the moment, so live with it :) | ||
| − | = Make it! = | + | = Current version = |
| − | + | Please note that this is an ongoing project: this page itself is a work in progress. Use at your own risk :) | |
| + | |||
| + | Current prototype ''do work'', but a better version is expected sometime soon enough. | ||
| + | |||
| + | You can also check past versions of this project: | ||
| + | * nope, actually this one is the first :-) | ||
| + | |||
| + | == Make it! == | ||
| + | Because there are quite a lot of pictures of the build, check the sub-page describing the [[Projets:Perso:2011:Motorshield:assembly|assembly process]]. | ||
| + | [[File:Motorshield-lab.jpg|400px|center|thumb]] | ||
| + | <center>A nice SMD assembly station, isn't it ?</center> | ||
| + | |||
| + | The current board design wasn't really optimised for DIY processes: | ||
* 6 mil spacing (0.15mm), 12mil tracks: so to speak "class 5" (not sure this is an international thing ; the higher the class, the harder to manufacture. It is probably a french standard). | * 6 mil spacing (0.15mm), 12mil tracks: so to speak "class 5" (not sure this is an international thing ; the higher the class, the harder to manufacture. It is probably a french standard). | ||
* 0.3 mm vias | * 0.3 mm vias | ||
These are Pcb Pool standard process parameters - board house I went with for the first prototypes. | These are Pcb Pool standard process parameters - board house I went with for the first prototypes. | ||
| + | [[File:Motorshield_TOP.png|400px|center|thumb]] | ||
| + | [[File:Motorshield_BOT.png|400px|center|thumb]] | ||
| + | <center>Don't try this at home, kids !</center> | ||
You can either: | You can either: | ||
* go for a pro fab house | * go for a pro fab house | ||
| + | * buy one of our prototypes | ||
* tweak the current design to adapt to your manufacturing abilities | * tweak the current design to adapt to your manufacturing abilities | ||
| − | * come with us tweak the lab pcb fab equipment to achieve such results | + | * come with us tweak the lab pcb fab equipment to achieve such results |
| + | ''Amusing fact: just for fun (at 3am we get sweet spots for stupid challenges ;), we tried to make the bottom layer with our not-yet-trimmed pcb-process at the lab, and it went out suprisingly well. It is highly probable that in a rather near future we will be able to actually manufacture such PCB directly at the lab (of course, without metal vias, soldermask and silkscreen: those are for quite later on ;)'' | ||
| − | + | == Use it! == | |
| − | + | ||
| − | = Use it! = | + | |
There's no deep, thorough tutorial about this yet. Check what is done with the original adafruit version, and come back later to check what we are using this for - once I document the related projects ;) | There's no deep, thorough tutorial about this yet. Check what is done with the original adafruit version, and come back later to check what we are using this for - once I document the related projects ;) | ||
Spoiler alert: one of them is related to Physical Etoys/Squeakbot (STFW :) | Spoiler alert: one of them is related to Physical Etoys/Squeakbot (STFW :) | ||
| Line 61: | Line 78: | ||
More info on the [[Projets:Perso:2011:Motorshield:use|related sub-page]]. | More info on the [[Projets:Perso:2011:Motorshield:use|related sub-page]]. | ||
| − | |||
| − | |||
| − | |||
| − | |||
| − | |||
| − | |||
| − | |||
| − | |||
| − | |||
| − | |||
| − | |||
| − | |||
| − | |||
| − | |||
| − | |||
| − | |||
| − | |||
| − | |||
| − | |||
| − | |||
| − | |||
| − | |||
| − | |||
| − | |||
| − | |||
| − | |||
| − | |||
| − | |||
| − | |||
| − | |||
| − | |||
| − | |||
| − | |||
| − | |||
| − | |||
| − | |||
| − | |||
| − | |||
| − | |||
| − | |||
| − | |||
| − | |||
| − | |||
| − | |||
| − | |||
| − | |||
| − | |||
| − | |||
| − | |||
| − | |||
| − | |||
| − | |||
| − | |||
| − | |||
| − | |||
| − | |||
| − | |||
| − | |||
| − | |||
| − | |||
| − | |||
| − | |||
| − | |||
| − | |||
| − | |||
| − | |||
| − | |||
| − | |||
| − | |||
| − | |||
| − | |||
| − | |||
| − | |||
| − | |||
| − | |||
| − | |||
| − | |||
| − | |||
| − | |||
| − | |||
| − | |||
| − | |||
| − | |||
| − | |||
| − | |||
| − | |||
| − | |||
| − | |||
| − | |||
| − | |||
| − | |||
| − | |||
| − | |||
| − | |||
| − | |||
| − | |||
| − | |||
| − | |||
| − | |||
| − | |||
| − | |||
| − | |||
| − | |||
| − | |||
| − | |||
| − | |||
| − | |||
| − | |||
| − | |||
| − | |||
| − | |||
| − | |||
| − | |||
| − | |||
| − | |||
| − | |||
= Resources = | = Resources = | ||
| Line 182: | Line 83: | ||
Check adafruit version of the library required to use this shield. It works okay. See previous section for limitations and some example code. | Check adafruit version of the library required to use this shield. It works okay. See previous section for limitations and some example code. | ||
| − | Come back later for full eagle files of this design, I'm still trying to figure out a way to upload any kind of file on this wiki ! Contact me directly if the images on this page aren't enough for you. As soon as I figure a way to upload the Eagle design files on here, I will. | + | Come back later for full eagle files of this design, I'm still trying to figure out a way to upload any kind of file on this wiki ! |
| + | [[File:Motorshield_SCH.png|center|400px]] | ||
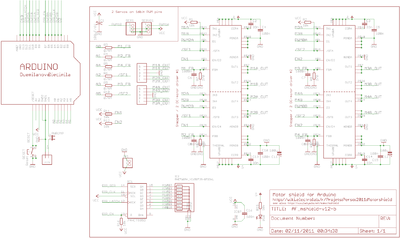
| + | <center>I know, it sucks to have only a .png</center> | ||
| + | |||
| + | Contact me directly if the images on this page aren't enough for you. As soon as I figure a way to upload the Eagle design files on here, I will. | ||
== Links == | == Links == | ||
| Line 192: | Line 97: | ||
This is just a prototype at the moment. Check its smaller/older brother on adafruit, snootlab, or get in touch with contact@electrolab.fr if you ''really'' wanna buy one of the prototypes. | This is just a prototype at the moment. Check its smaller/older brother on adafruit, snootlab, or get in touch with contact@electrolab.fr if you ''really'' wanna buy one of the prototypes. | ||
| − | Please note that price would be significantly higher than that of the Motorshield, like | + | Please note that price would be significantly higher than that of the Motorshield, like 50€ or even more. That's because: |
* that's what they cost me right now | * that's what they cost me right now | ||
| − | * the MC33932 | + | * the MC33932 is stronger but more expensive than L293D: even in a production run, costs would be higher |
* these are still prototypes, with tiny volume (eg: more expensive pcb and components, because volume is what drives prices down) | * these are still prototypes, with tiny volume (eg: more expensive pcb and components, because volume is what drives prices down) | ||
| − | * the prototype boards are assembled by hand. Even if I happily give some of my time to design stuff, assembling batches is boring and | + | * the prototype boards are assembled by hand. Even if I happily give some of my time to design stuff, assembling batches is boring and thus my time doing so isn't totally free (as in free beer. But you can offer me one :-). |
= More info = | = More info = | ||
| − | Check all the ressources associated with the original version of this shield. For anything regarding this particular version, you can contact me directly through the electrolab mailing list, or on IRC: clmnt/#electrolab on freenode networks. | + | Check all the ressources associated with the original version of this shield. |
| + | |||
| + | For anything regarding this particular version, you can contact me directly through the electrolab mailing list, or on IRC: clmnt/#electrolab on freenode networks. | ||
You can check the [[Projets:Perso:2011:Motorshield:faq|Frequently Asked Questions]] sub page for more info & troubleshooting. | You can check the [[Projets:Perso:2011:Motorshield:faq|Frequently Asked Questions]] sub page for more info & troubleshooting. | ||
| − | |||
| − | |||
| − | |||
| − | |||
| − | |||
| − | |||
| − | |||
| − | |||
| − | |||
| − | |||
| − | |||
| − | |||
| − | |||
| − | |||
| − | |||
| − | |||
| − | |||
| − | |||
| − | |||
| − | |||
| − | |||
| − | |||
| − | |||
| − | |||
| − | |||
| − | |||
| − | |||
| − | |||
| − | |||
| − | |||
| − | |||
| − | |||
| − | |||
| − | |||
= TODOs = | = TODOs = | ||
== Wishlist for next revisions == | == Wishlist for next revisions == | ||
| − | * check signal names (eg motor x forward should behave as expected) | + | * be sure the HW is 100% compatible. Today, it is not the case ! |
| − | * protect reverse polarity on power plug | + | ** check signal names (eg motor x forward should behave as expected) |
| − | * do something about the poor servo power design (including move that 2pinheader that shorts on the USB connector... what a pitty !) | + | ** decide on high/low PWMing in HW (inverter, or other enable - even if not recomended by spec). Should be done somehow. |
| − | * think about polyfuse on Vin jumper (protect arduino 5v reg) | + | * enhance features & slight rework |
| − | * bring led on D13 up | + | ** protect reverse polarity on power plug |
| − | * | + | ** do something about the poor servo power design (including move that 2pinheader that shorts on the USB connector... what a pitty !) |
| − | * add revision info sticker on pcb (datecode, SN) | + | ** think about polyfuse on Vin jumper (protect arduino 5v reg) |
| − | * make the pcb easier to manufacture (DIY friendly) | + | ** change led resistor value (maybe 5k or even less) |
| − | * | + | ** bring available digital I/O to headers |
| − | * | + | ** bring led on D13 up ? |
| − | * release a proper lib/code examples for specific features | + | ** bring analog I/O to headers, in case some features are not wanted |
| − | * | + | ** add holes for heatsink mounting + make some space for it |
| − | * add | + | ** design a better silkscreen (eg servo1 & servo1...) |
| − | * check how hard it'd be to be able to chain two of such boards to drive 4 steppers (RAMPS style) : mostly connector issues to chain shift registers + SW to drive it, I suppose... even it'd be more clever to do an all in one platform directly. | + | ** SMD condo ? |
| − | * experiment with paralleling outputs and max power | + | * manufacturing |
| − | * | + | ** add revision info sticker on pcb (datecode, SN) |
| − | * try to mess with a current-loop mode firmware | + | ** make the pcb easier to manufacture (DIY friendly) |
| − | * | + | ** implement end of line testability in a more easy manner (eg testpoints) |
| − | * your wildest dream here ! :) | + | ** check/think about a small volume production price |
| + | * code & support: | ||
| + | ** release a proper lib/code examples for specific features | ||
| + | ** clean up related pages | ||
| + | ** add troubleshooting and examples robot | ||
| + | ** document testing | ||
| + | * crazy features | ||
| + | ** check how hard it'd be to be able to chain two of such boards to drive 4 steppers (RAMPS style) : mostly connector issues to chain shift registers + SW to drive it, I suppose... even it'd be more clever to do an all in one platform directly. | ||
| + | ** experiment with paralleling outputs and max power | ||
| + | ** try to mess with a current-loop mode firmware | ||
| + | ** mega version (eg, with more features, like RAMPS, or full robotic platform ?) | ||
| + | ** your wildest dream here ! :) | ||
| − | == TODO for this page == | + | == TODO for this page/project doc == |
| − | * Move those pics to a sub-page/download, or sort them. | + | * <strike>Move those pics to a sub-page/download, or sort them.</strike> |
| − | * Add a true overview pic with the board and adapted motors/loads. | + | * <strike>Add a true overview pic with the board and adapted motors/loads.</strike> |
| − | * Create assembly sub-page | + | * <strike>Create assembly sub-page</strike> |
| − | * Clean this page | + | * <strike>Clean this page</strike> |
| − | * Add history/release notes in an explicit way | + | * <strike>Add history/release notes in an explicit way</strike> |
| + | * translate either in french or english assembly page | ||
| + | * clean "use it" page. | ||
| + | * find a way to upload eagle files & source code --> See [http://www.mediawiki.org/wiki/Manual:FAQ#How_do_I_allow_uploading_of_additional_formats.3F LocalSettings.php] | ||
| + | * find a way to display source code --> [http://www.mediawiki.org/wiki/Extension:SyntaxHighlight_GeSHi SyntaxHighlight_GeSHi extension] | ||
| + | * organize the beta testing phase + reports | ||
| + | * prepare the RC1 rework phase | ||
Latest revision as of 15:18, 18 May 2012
Contents
Introduction
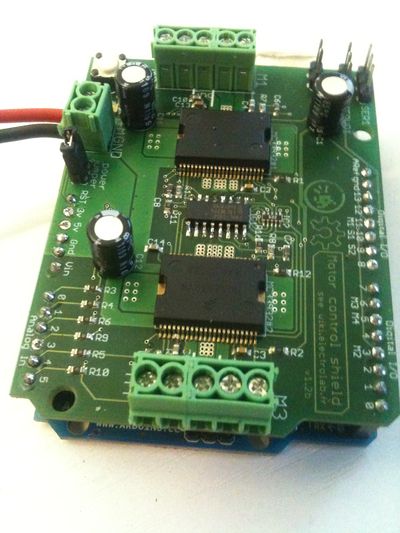
What should you do if you wanna plug motors to your Arduino ? There's this cool Motorshield from Adafruit industries, but it handles such little currents ! Fortunately, there are other nice chips out there...
OpenHW is about commiting patches, right ? So here's mine !
Latest news
- This project has been put to good use for a student project, stay tuned for more information/pics !
- Almost everything is ready to launch the first production batch. Pre-order will be opened soon.
- This design serves as a reference for the ongoing tests on PCB fabrication. We're pretty close to being able to manufacture stuff like that in the lab :)
Design goals
- The goal of this project is to replace the weak L293D of Adafruit's Motorshield with a stronger chip, a MC33932, which is a fully integrated dual H-bridge rated at 5.0A (vs 0.6A for the L293D).
- One major constraint is to keep a full pin/function compatibility, so that this shield can be a drop-in replacement for Adafruit's version.
- I also chose to use mostly SMD components, because I am fed up with all those thruhole resistors: people should live with their time, and in my opinion, those are a thing of the past.
Note that I decided to call this shield "the Arduino sHHHHield - an Arduino shield with four H bridges" and am proudly claiming full fame and credits and everything for such a lame name :-)
Features
As intended, this shield is very similar to Adafruit's current version:
- 2 connections for 5V 'hobby' servos - still the huge drawback of pumping on the 5v regulators, which means you cannot expect to use torque-full servos.
- Up to 4 bi-directional DC motors with individual 8-bit speed selection (so, about 0.5% resolution)
- Up to 2 stepper motors (unipolar or bipolar) with single coil, double coil, interleaved or micro-stepping.
- Pull down resistors keep motors disabled during power-up
- Big terminal block connectors to easily hook up wires (10-22AWG) for motor and power supply
- Arduino reset button brought up top
- 2-pin terminal block to connect external power, for seperate logic/motor supplies
- Tested compatible with Duemilanove & UNO. Not tested on Mega yet, but should work as the original shield. Not tested for steppers yet neither (see below: there might be issues with the current prototype, but it'll be corrected on final version).
There are some differences tho:
- Max voltage is 28v for the H-bridge [1]
- Mostly compatible with easy-to-use Arduino software libraries from Adafruit [2]
- 4 H-Bridges: MC33932 chipset can provide 5.0A per bridge (at 6.5A overcurrent kicks in) [3]
- Current feedback readable directly on four of the analog inputs of the Arduino [4]
- Status flag for each chip on two other analog inputs [4]
- As I've done the design rather in a hurry for another project in a 12v environment, condensators have been chosen for this value (actually, 16v max if I remember well). Mount other values and you'll be able to get closer to the MC33932 max voltage rating. Be reasonable: at full amps, it'll get you close to 500w, even with high efficiency it'll fry the chip - or at least get it in thermal protection very fast - without additional cooling.
- Most notably, the enable (and thus PWM and speed control) works the opposite way at the moment, that is setspeed(255) will get stop and setspeed(0) will get fullspeed. See sections below for details.
- This is RMS (eg: mean over time). Actually depends on how well you cool it. This chipset implements a thermal shutdown protection and short circuit/over current protection. I've tested it for quite a quile at 2.5A per bridge "stock", eg without any additionnal heatsink, and it went hot but not too hot.
- Check below for details on how to use this
Yeah, I know, I hate those "see conditions below" things, but hey, this is only a prototype at the moment, so live with it :)
Current version
Please note that this is an ongoing project: this page itself is a work in progress. Use at your own risk :)
Current prototype do work, but a better version is expected sometime soon enough.
You can also check past versions of this project:
- nope, actually this one is the first :-)
Make it!
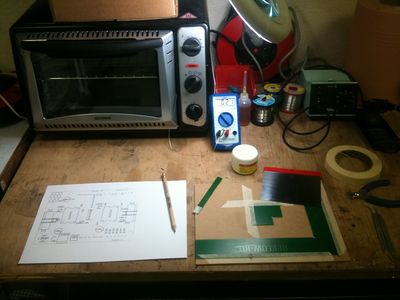
Because there are quite a lot of pictures of the build, check the sub-page describing the assembly process.
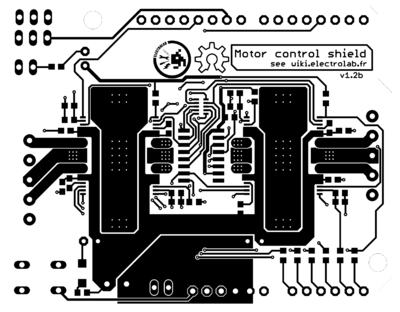
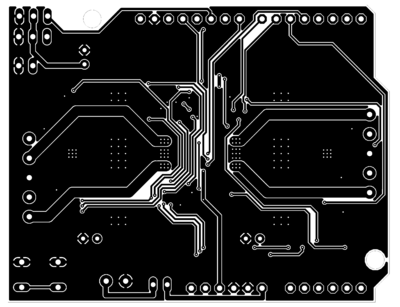
The current board design wasn't really optimised for DIY processes:
- 6 mil spacing (0.15mm), 12mil tracks: so to speak "class 5" (not sure this is an international thing ; the higher the class, the harder to manufacture. It is probably a french standard).
- 0.3 mm vias
These are Pcb Pool standard process parameters - board house I went with for the first prototypes.
You can either:
- go for a pro fab house
- buy one of our prototypes
- tweak the current design to adapt to your manufacturing abilities
- come with us tweak the lab pcb fab equipment to achieve such results
Amusing fact: just for fun (at 3am we get sweet spots for stupid challenges ;), we tried to make the bottom layer with our not-yet-trimmed pcb-process at the lab, and it went out suprisingly well. It is highly probable that in a rather near future we will be able to actually manufacture such PCB directly at the lab (of course, without metal vias, soldermask and silkscreen: those are for quite later on ;)
Use it!
There's no deep, thorough tutorial about this yet. Check what is done with the original adafruit version, and come back later to check what we are using this for - once I document the related projects ;) Spoiler alert: one of them is related to Physical Etoys/Squeakbot (STFW :) Hint: having 8 half bridge on a board means you could control, like, 8 lamps. Or whatever requires few amps.
More info on the related sub-page.
Resources
Download
Check adafruit version of the library required to use this shield. It works okay. See previous section for limitations and some example code.
Come back later for full eagle files of this design, I'm still trying to figure out a way to upload any kind of file on this wiki !
Contact me directly if the images on this page aren't enough for you. As soon as I figure a way to upload the Eagle design files on here, I will.
Links
- http://www.adafruit.com/products/81
- http://www.ladyada.net/make/mshield/
- http://shop.snootlab.com/powerduino/87-rotoshield.html
Buy Kit
This is just a prototype at the moment. Check its smaller/older brother on adafruit, snootlab, or get in touch with contact@electrolab.fr if you really wanna buy one of the prototypes.
Please note that price would be significantly higher than that of the Motorshield, like 50€ or even more. That's because:
- that's what they cost me right now
- the MC33932 is stronger but more expensive than L293D: even in a production run, costs would be higher
- these are still prototypes, with tiny volume (eg: more expensive pcb and components, because volume is what drives prices down)
- the prototype boards are assembled by hand. Even if I happily give some of my time to design stuff, assembling batches is boring and thus my time doing so isn't totally free (as in free beer. But you can offer me one :-).
More info
Check all the ressources associated with the original version of this shield.
For anything regarding this particular version, you can contact me directly through the electrolab mailing list, or on IRC: clmnt/#electrolab on freenode networks.
You can check the Frequently Asked Questions sub page for more info & troubleshooting.
TODOs
Wishlist for next revisions
- be sure the HW is 100% compatible. Today, it is not the case !
- check signal names (eg motor x forward should behave as expected)
- decide on high/low PWMing in HW (inverter, or other enable - even if not recomended by spec). Should be done somehow.
- enhance features & slight rework
- protect reverse polarity on power plug
- do something about the poor servo power design (including move that 2pinheader that shorts on the USB connector... what a pitty !)
- think about polyfuse on Vin jumper (protect arduino 5v reg)
- change led resistor value (maybe 5k or even less)
- bring available digital I/O to headers
- bring led on D13 up ?
- bring analog I/O to headers, in case some features are not wanted
- add holes for heatsink mounting + make some space for it
- design a better silkscreen (eg servo1 & servo1...)
- SMD condo ?
- manufacturing
- add revision info sticker on pcb (datecode, SN)
- make the pcb easier to manufacture (DIY friendly)
- implement end of line testability in a more easy manner (eg testpoints)
- check/think about a small volume production price
- code & support:
- release a proper lib/code examples for specific features
- clean up related pages
- add troubleshooting and examples robot
- document testing
- crazy features
- check how hard it'd be to be able to chain two of such boards to drive 4 steppers (RAMPS style) : mostly connector issues to chain shift registers + SW to drive it, I suppose... even it'd be more clever to do an all in one platform directly.
- experiment with paralleling outputs and max power
- try to mess with a current-loop mode firmware
- mega version (eg, with more features, like RAMPS, or full robotic platform ?)
- your wildest dream here ! :)
TODO for this page/project doc
-
Move those pics to a sub-page/download, or sort them. -
Add a true overview pic with the board and adapted motors/loads. -
Create assembly sub-page -
Clean this page -
Add history/release notes in an explicit way - translate either in french or english assembly page
- clean "use it" page.
- find a way to upload eagle files & source code --> See LocalSettings.php
- find a way to display source code --> SyntaxHighlight_GeSHi extension
- organize the beta testing phase + reports
- prepare the RC1 rework phase
