Projets:Perso:2013:RaspEink FHEM
Contents
Introduction
The aim of the RaspEink project is to drive a small e-Paper display with a Raspberry Pi. Such a display can be used for many purposes. Here we will create a status display for FHEM, a well known home automation software.
Hardware
- Raspberry Pi Model B
- 2.7 inch E-Paper display from Embedded Artists
Software Overview
- Raspian linux from official source
- FHEM home automation software
- Perl, required to run FHEM
- Python for extraction of data from logfile and generation of a bitmap
- The driver used to send bitmap to display.
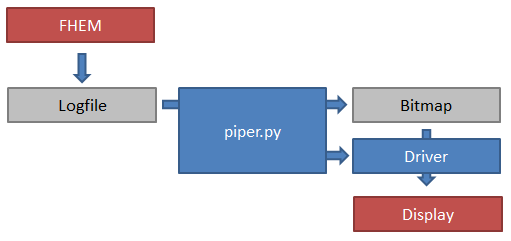
Software diagram:
The central piece of software is the Python program (piper.py). It processes the FHEM logfiles and extracts all required information (temperatures, valve positions, humidity and burner status). It then creates a bitmap from this information and saves it to a file. The driver, written in C, loads the BMP and sends it to the display through SPI. A cron job executes the two programs sequentially every 5-minutes.
Step 1: Setup the Hardware and test it
Follow the steps from the following article first to install and test the display driver: Projets:Perso:2013:RaspEink
Step 2: Install and set up FHEM
There are numerous guides on how to install FHEM on a Raspberry Pi. Here is one example: to Home Automation with Raspberry Pi
One FHEM is running, you can set up your heating system. My system consists of 3xFHT thermostats for the rooms + acutators for the radiators, one S300 TH for measuring external temperature and humidity and a radio-controlled 220V switch FS20 for activating the control line of the heater itself. You can have a look at my [1] for inspiration.
Step 3: Adapt piper.py to your needs
Download the complete RaspEink_FHEM archive including piper.py here.
Piper.py uses a number of variables to adapt to your FHEM installation:
Path to the fhem log files. Don't forget the "/" at the end
log_path = "/opt/fhem/log/"
Names of the heating actuators (e.g. FHT). These have to match the room name of your logfile, e.g. chambre-2015.log.
exterior is the name of the exterior temperature probe (e.g. S300 TH) log file.
heater is the name of the switch (e.g. FS20) which activates the heating system.
room1 = "chambre"
room2 = "sdb"
room3 = "salon"
exterior = "exterieur"
heater= "Chauffage"
Next, define the öetters used to identify each room on the display:
symbol_room1 = "C"
symbol_room2 = "B"
symbol_room3 = "S"
symbol_exterior = "X"
And lastly, the threshold values for the actuators, i.e. when do they switch on the heater (at 30% open) and when will they shut it down (at 20% open).
actuator_high_room1 = 30
actuator_low_room1 = 20
actuator_high_room2 = 30
actuator_low_room2 = 20
actuator_high_room3 = 30
actuator_low_room3 = 20
Step 4: Test piper.py
Run piper.py with:
python piper.py
It should create an output.bmp with the current readings.
Step 5: Setup cron
Cron can be used to periodically run piper.py to create the output.bmp followed by epaper<i> to send the BMP to the display.
Here is what my cron looks like for executing the above every 5 minutes:
# m h dom mon dow command
*/5 * * * * python /home/pi/raspeink/piper.py && /home/pi/raspeink/epaper /home/pi/raspeink/output.bmp > /home/pi/raspeink/cron.log
