Projets:Perso:2013:RaspEink FHEM
Contents
Introduction
The aim of the RaspEink project is to drive a small e-Paper display with a Raspberry Pi. Such a display can be used for many purposes. Here we will create a status display for FHEM, a well known home automation software.
Hardware
- Raspberry Pi Model B
- 2.7 inch E-Paper display from Embedded Artists
Software Overview
- Raspian linux from official source
- FHEM home automation software
- Perl, required to run FHEM
- Python for extraction of data from logfile and generation of a bitmap
- The driver used to send bitmap to display.
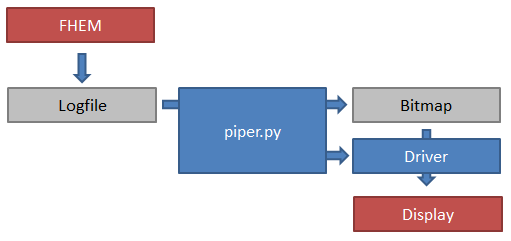
Software diagram:
The central piece of software is the Python program (piper.py). It processes the FHEM logfiles and extracts all required information (temperatures, valve positions, humidity and burner status). It then creates a bitmap from this information and saves it to a file. The driver, written in C, loads the BMP and sends it to the display through SPI. A cron job executes the two programs sequentially every 5-minutes.
Step 1: Setup the Hardware and test it
Follow the steps from the following article first to install and test the display driver: Projets:Perso:2013:RaspEink
Step 2: Install and set up FHEM
There are numerous guides on how to install FHEM on a Raspberry Pi. Here is one example: to Home Automation with Raspberry Pi
One FHEM is running, you can set up your heating system. My system consists of 3xFHT thermostats for the rooms + acutators for the radiators, one S300 TH for measuring external temperature and humidity and a radio-controlled 220V switch FS20 for activating the control line of the heater itself. You can have a look at my [1] for inspiration.
Step 3: Adapt piper.py to your needs
Download the complete RaspEinkFhem archive including piper.py here.
Piper.py uses a number of variables to adapt to your FHEM installation:
Path to the fhem log files. Don't forget the "/" at the end
log_path = "/opt/fhem/log/"
Names of the heating actuators (e.g. FHT). These have to match the room name of your logfile, e.g. chambre-2015.log.
exterior is the name of the exterior temperature probe (e.g. S300 TH) log file.
heater is the name of the switch (e.g. FS20) which activates the heating system.
room1 = "chambre"
room2 = "sdb"
room3 = "salon"
exterior = "exterieur"
heater= "Chauffage"
Next, define the öetters used to identify each room on the display:
symbol_room1 = "C"
symbol_room2 = "B"
symbol_room3 = "S"
symbol_exterior = "X"
And lastly, the threshold values for the actuators, i.e. when do they switch on the heater (at 30% open) and when will they shut it down (at 20% open).
actuator_high_room1 = 30
actuator_low_room1 = 20
actuator_high_room2 = 30
actuator_low_room2 = 20
actuator_high_room3 = 30
actuator_low_room3 = 20
Step 4: Test piper.py
Run piper.py with:
python piper.py
It should create an output.bmp with the current readings.
Step 5: Setup cron
Cron can be used to periodically run piper.py to create the output.bmp followed by epaper to send the BMP to the display.
Here is what my cron looks like for executing the above every 5 minutes:
# m h dom mon dow command
*/5 * * * * python /home/pi/raspeink/piper.py && /home/pi/raspeink/epaper /home/pi/raspeink/output.bmp > /home/pi/raspeink/cron.log
